Showing posts with label Peacock Party. Show all posts

Wednesday, May 8, 2024

Catching Up on BOMs

There are multiple different Block of the Month (BOM) programs that I've been following so far this year, and I was very happy to get caught up on two of them this week. The first one was the Chatsworth Quilt-Alonga pattern designed by Doug Leko of Antler Quilt Design, and the quilt-along is hosted by Moda Fabrics. The quilt finishes at 74" x 88", but the book also includes other size variations and layouts. It's not too late to join the quilt-along! These are blocks #7 & 8, which will finish at 16".

Chatsworth, Block 7

Chatsworth, Block 8

Chatsworth, Blocks 7 & 8

After those were finished, I turned to my Sewcialites 2 blocks. Sewcialites 2 originally ran as a weekly block program at Fat Quarter Shop from October, 2022 until April, 2023. All of the block patterns are still available on the Fat Quarter Shop's website. Our quilt guild is doing it as a BOM, with two blocks due each month. 

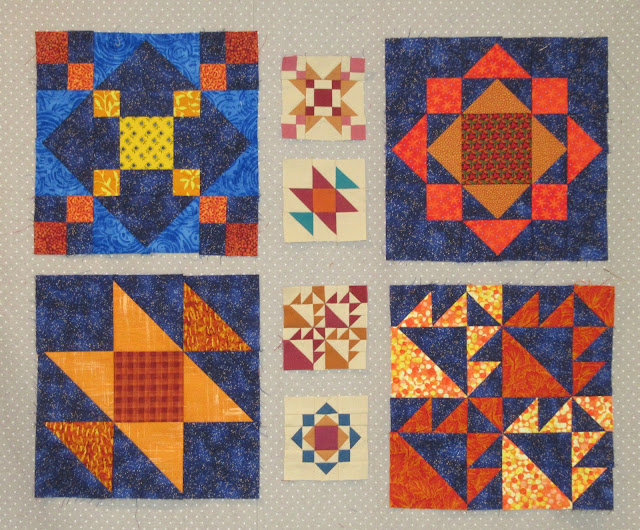
The Sewcialites 2 pattern includes instructions for blocks in three different sizes: 3", 6" and 9", and I've been making blocks in all three sizes. I haven't made the 6" blocks yet this month, but I did get the others done. Here are Blocks #3 - 6, our assignment for April and May, in the 9" size.

Sewcialites 2, 9" Blocks #3 - 6

These are the same blocks in the 3" size, although they will look like the same scale in the photo.

Sewcialites 2, 3" Blocks #3 - 6

The bottom left block in the 3" set was the hardest one yet. There are 48 pieces total in that block, and the small half-square triangles finish at only 1/2" each. All of the 3" blocks are very challenging to make.

It's fun to see the different block sizes together on the design wall.


I hope to get the last of the 6" Sewcialites 2 blocks done this week. Then I would be completely caught up on this project.

Linking up with:
Midweek Makers at Quilt Fabrication
Wednesday Wait Loss at Inquiring Quilter
Needle and Thread Thursday at My Quilt Infatuation
Finished or Not Friday at Alycia Quilts
Peacock Party at Wendy's Quilts and More
Brag About Your Beauties at From Bolt to Beauty


Happy quilting everyone!

Julie in GA 
Wednesday, March 27, 2024

Around the Twist Quilt Top

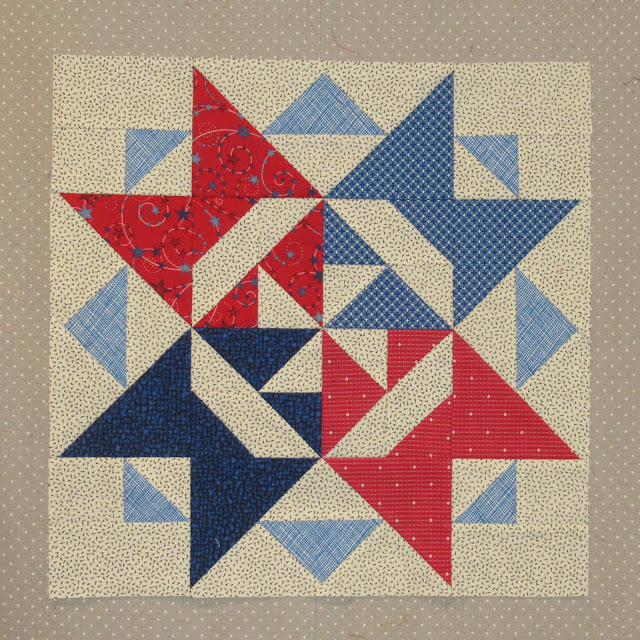
Our quilt guild had a group sewing day at the end of February to work together on baby quilts. Most people were using a pattern supplied by one of the members, but of course I felt the need to complicate things for myself and made a totally different design. This is my latest Around the Twist baby quilt top.

Around the Twist, 38.5" x 45"

The starting point for this quilt was the background fabric. According to my records, this adorable print was purchased in 1998. 


I knew that I had used the same fabric for a small quilt many years ago. I managed to find a photo (not digital) of this Snowball/9-Patch quilt, made in 1998. I had totally forgotten about the coordinating striped fabric.

Snowball/9-Patch Quilt, 1998

The Around the Twist pattern used for the new quilt top is a design I have made a few times before, most recently as a baby quilt last year. (The quilt name under the next photo will take you to my blog post with more info about the pattern and this quilt.)

If you compare the finished quilt in the photo above with the quilt top at the beginning of this post, you might notice a key difference--the new version used five colors for the rings rather than the four in last year's quilt. Adding one more color made construction much more complicated. There are two different blocks in this quilt, Snowball blocks and Twist blocks. Every block uses four of the five colors around the center in very specific order to make the design work. That meant making five different sets of each block. My photos show two versions of each below.

Snowball blocks

Twist blocks

Piecing the blocks required concentration in order to get the colors in the right places, but it all worked out well in the end. I need to dig through my stash for a good backing fabric, then I can get this quilted and ready to donate. I've already pulled together another group of fabrics to make yet another version of this pattern. I considered using seven different colors for the rings in that one, but I think I will stay with five.


Linking up with:
Midweek Makers at Quilt Fabrication
Wednesday Wait Loss at Inquiring Quilter
Needle and Thread Thursday at My Quilt Infatuation
Finished or Not Friday at Alycia Quilts
Peacock Party at Wendy's Quilts and More


Happy quilting everyone!

Julie in GA

Wednesday, January 31, 2024

Jabberwocky Top Finished!

January has been a busy month including lots of quilting time. I've started way too many new quilts, but I'm very happy to have made progress on one of my projects from last year too. This is my finished Jabberwocky quilt top!

Jabberwocky, block pattern by Judy Martin
65" wide x 76.75" long

The Jabberwocky block pattern is by Judy Martin in The Block Book. That was the name she used for her block, and I didn't see any reason to change it for my quilt. The book is out of print, but you can still buy it online.


The star blocks for this quilt were made all throughout 2023 as part of the Rainbow Scrap Challenge. The last blocks were made in October, then it was time to figure out my setting. After many auditions, I chose to offset the columns of blocks, and I used a grey spotty fabric as the sashing and borders. Here are a few of my favorite blocks.


Finishing this quilt top was my One Monthly Goal for January. Success at my first OMG of the year sure feels good!


Linking up with:
Midweek Makers at Quilt Fabrication
Wednesday Wait Loss at Inquiring Quilter
Needle and Thread Thursday at My Quilt Infatuation
Finished or Not Friday at Alycia Quilts
Can I Get a Whoop Whoop at Confessions of a Fabric Addict
Peacock Party at Wendy's Quilts and More
Oh Scrap! at Quilting is more fun than Housework
One Monthly Goal at Stories from the Sewing Room


Happy quilting everyone!

Julie in GA

Thursday, January 18, 2024

First Finished Quilt of 2024

One of my biggest quilting goals for 2024 is to finish more quilts. Finishing has been my least favorite part of quilting ever since I started, but the number of unquilted tops hanging around in my sewing room closets has gotten ridiculous! I'm afraid to count how many there are, so it's time to get some of them finished.

The first quilt to be finished for 2024 is the Charm 9-Patch quilt. This quilt started as a set of 9-patch blocks made from charm squares by one or more members of our quilt guild. The guild president had made up several kits of these type of blocks and handed them out at a meeting last April with the challenge to bring back a finished quilt the next month. It took me several months longer, but it's finally done!

Charm 9-Patch quilt, 37.5" x 49.5" after washing

This was my favorite block in the quilt top. The sizes of the blocks tended to vary, and they all got trimmed down to the same measurement before they were joined together.


When I first received the blocks, I considered adding sashing in between to give the blocks a little separation, but I realized that joining them without sashing would produce a top that would fit on a backing made from a single width of fabric. I chose a well-aged Hawaiian print for the back and binding.


Here's a closer look at the backing fabric, and you can also see the meander quilting done in light blue.


This quilt will be donated back to the quilt guild for one of our community service partners. It feels great to have a finish, and I hope it's the first of many quilts to be completed this year.

Linking up with:
Needle and Thread Thursday at My Quilt Infatuation
Finished or Not Friday at Alycia Quilts
Can I Get a Whoop Whoop at Confessions of a Fabric Addict
Brag About Your Beauties at From Bolt to Beauty
Thank Goodness It's Finished Friday (TGIFF) at Devoted Quilter

Happy quilting everyone!

Julie in GA

Friday, November 24, 2023

Pinwheel Christmas Trees

My newest projects were inspired by a friend's quilt that was displayed in our guild's booth at the Christmas fair a few weeks ago. This is Martha's Pinwheel Christmas Tree quilt.


For my first attempt, I wanted to get more colors into the design, sort of like the colors of the ornaments on a Christmas tree. I used a bright green print of Christmas tree lights along with scrappy green fabrics for the pinwheel blocks.


I liked the added colors in that version, but decided to make another one that is more like the original, with the background fabric in the pinwheel blocks. Here is my second tree. Both of my versions measure approximately 40" x 48".


Making my first version helped me realize that my favorite thing about this quilt is the airiness of the design with the background included in all of the pinwheels. This second version also includes a cute print of Christmas tree lights, but this time it's the cream background fabric. Click on the photo for a closer look.

I hope to get version #2 layered with batting and quilted up in the next week so that we can enjoy it for the Christmas season this year. I haven't decided what will happen with the other quilt top yet.

Linking up with:
Finished or Not Friday at Alycia Quilts
Can I Get a Whoop Whoop at Confessions of a Fabric Addict
Brag About Your Beauties at From Bolt to Beauty
Peacock Party at Wendy's Quilts and More
Thank Goodness It's Finished Friday (TGIFF) at Slice of Pi Quilts

Happy quilting everyone!

Julie in GA 

Wednesday, October 11, 2023

Another Bag (This Time for Me!)

After spending much of the month of August making all sorts of bags and wallets to be sold at our guild's Christmas market (see them HERE and HERE), it was finally time to make one for myself. I had been needing a new purse, and I purchased the pattern for the Daytripper 2.0 Crossbody Case in April at the Paducah quilt show.


My first read-through of the pattern left me rather confused, but I had heard from others that the ByAnnie patterns were easy to follow. Once I started working through the pattern step by step, it all went very smoothly. I made one change, making mine a little narrower than the size in the pattern. Here is my version of the Daytripper 2.0 bag.


The front of the bag has a nice deep pocket that runs the full width of the bag.


The other side of the bag is plain and shows off the Jinny Beyer border print beautifully.


For the inside I used one of my favorite blender prints, Bedrock, in grey. There is one pocket on the inside, the perfect size for a cell phone.

I've been using my new bag almost constantly since I finished it last month, including during a recent trip, and I am very happy with it. I would definitely recommend this pattern, and I look forward to trying some of the other ByAnnie patterns in the future.

Linking up with:
Wednesday Wait Loss at Inquiring Quilter
Midweek Makers at Quilt Fabrication
Needle and Thread Thursday at My Quilt Infatuation
Finished or Not Friday at Alycia Quilts
Can I Get a Whoop Whoop at Confessions of a Fabric Addict
Brag About Your Beauties at From Bolt to Beauty
Peacock Party at Wendy's Quilts and More


Happy quilting everyone!

Julie in GA

Wednesday, September 6, 2023

Dresden Ties Pillows

I have a project to share that has been finished for a few months, but didn't get delivered until just recently. This set of Dresden pillows were all made from my father's ties. 


I had previously made similar pillows for my mother and sister. These three were for my other sister, my brother, and myself. Now all of us have one of these wonderful memory pillows (even though very few of us actually remember Dad wearing most of the ties!)


Each of the three pillows is made from the same group of ties. I was lucky to be able to get enough pieces out of each tie for five pillows. The background fabric has a very faint plaid design.


For the backs, I used a piece of Essex cotton/linen blend. Next time I might try adding piping around the outside edge to better hold the shape of the pillow.


Linking up with:
Wednesday Wait Loss at Inquiring Quilter
Midweek Makers at Quilt Fabrication
Needle and Thread Thursday at My Quilt Infatuation
Finished or Not Friday at Alycia Quilts
Can I Get a Whoop Whoop at Confessions of a Fabric Addict
Brag About Your Beauties at From Bolt to Beauty
Peacock Party at Wendy's Quilts and More
Oh Scrap! at Quilting is more fun than Housework


Happy quilting everyone!

Julie in GA

Friday, September 1, 2023

Summer Camp Mystery Quilt Reveal

My very favorite quilting project of the entire summer has been the  Summer Camp Mystery by Weeks Ringle and Bill Kerr. of Modern Quilt Studio. Today is the official end of the mystery and reveal/link-up of participant's quilts. I can't wait to see them all! Here is my finished quilt top which I am calling "Sedona."


The mystery started on June 1st with the first group of block patterns, and continued with clues until July 14th. Each week we got to choose which blocks we wanted to make, averaging about 20 blocks in 4-5 different block designs per
 week. The blocks are small, only 5" finished size, and cutting all the pieces probably took longer than stitching the blocks. It was a challenge to keep up each week, but I loved every minute of it! Here are some of my blocks up close.


My color palette was inspired by the U.S. desert southwest, especially the red rocks around Sedona. The pattern for the mystery included three choices of quilt size to make, and at the end, we discovered that there were three different layouts to choose from too. My quilt top features the "Campfire" layout in the napping (medium) size, approximately 55" x 78". I haven't figured out a plan yet for how I want to quilt it, but it will be very simple quilting to let all the block piecing be the focus.

Indoor photo

If you are interested in seeing other versions of the Summer Camp Mystery Quilt, you can check them out at the Facebook page for Modern Quilt Studio. They had over 1000 participants in this mystery, and you will be blown away by the variety of quilts people have made. I can't wait to see what Weeks and Bill come up with for their next mystery!

Linking up with:
Modern Quilt Studio Facebook page
Needle and Thread Thursday at My Quilt Infatuation
Finished or Not Friday at Alycia Quilts
Can I Get a Whoop Whoop at Confessions of a Fabric Addict
Brag About Your Beauties at From Bolt to Beauty
Peacock Party at Wendy's Quilts and More
Oh Scrap! at Quilting is more fun than Housework


Happy quilting everyone!

Julie in GA

Thursday, August 17, 2023

I'm Turning Into a Bag Lady!

Most of my stitching time over the past week has been spent on more pieces for the guild's Christmas market in November. After finishing the Diva Wallets (see last week's post HERE,) I continued with the same team fabrics to make sets of zipper pouches. 


The University of Georgia pouches have a very old fabric for the lining, Pointillist Palette in red and black.


The lining for the Georgia Tech pouches is a wavy black and white check.


Here are the pieces for two sets of pouches, plus the zippers for them. Each main fabric has been fused to the lining fabric plus asmall rectangle of interfacing to stiffen the bottom of each pouch. 


I was able to make a total of 11 pouches from these fabrics, and I still have more of the Tech fabric left. They range in size from 2x2x4 for the tiniest size up to 4x4x8 for the largest. The close-up of the UGA pouches shows how the lining fabric changes color.


The pattern that I used for these is "A Little Duffle Do It" by Karen West of For the Love of Fabric. I've made many of these pouches over the years and frequently given them as gifts. I checked, and the pattern is still available at many places online.
After the pouches were finished, I switched over to making a tote bag. For this project, I used the pattern "A Bonnie Bag" by Favorite Things. My copy of this pattern shows a date of 1995 on it, so it may be a little harder to find. I've made a few changes to my version, including eliminating the flap and button closure.


This bag is another that I have made as a gift many times, although it has been several years since the last ones. This time I used a red border stripe print and a coordinating fabric for the lining/contrast. The finished size of the bag is about 14.5" wide x 6.5" deep x 14" high.


There is a zipper across the top (but I'd like to figure out a better way to set the zipper in for the next bag.)


There are two padded outside pockets, one on each side...


and six pockets in the lining.


My biggest concern about the tote bag is how it might be priced for the Christmas market. I know that the fabrics I used for this bag were purchased many years ago, probably for not more than $5-6/yard, and most of the other supplies (zipper, webbing for straps, fleece interfacing) were probably purchased on sale. However, when I calculated the cost of all the supplies to make one bag at current prices, it came to more than $35 (and that's with figuring fabric at only $10/yard.) 

I'm planning to take this bag along to our guild meeting tomorrow and talk to some of the people who have more experience with pricing for the market. I'd be glad to make more of these bags if they think the bags will sell at a reasonable price. Otherwise, I can make many more of those little pouches for the same investment of both money and time.


Linking up with:
Wednesday Wait Loss at Inquiring Quilter
Midweek Makers at Quilt Fabrication
Needle and Thread Thursday at My Quilt Infatuation
Finished or Not Friday at Alycia Quilts
Can I Get a Whoop Whoop at Confessions of a Fabric Addict
Brag About Your Beauties at From Bolt to Beauty
Peacock Party at Wendy's Quilts and More


Happy quilting everyone!

Julie in GA
Related Posts Plugin for WordPress, Blogger...