Showing posts with label Moving It Forward. Show all posts

Monday, December 2, 2019

Design Wall Monday--12/2/2019

The week after Thanksgiving means that Bonnie Hunter's annual mystery quilt is up and running, a time that many quilters wait for anxiously each year. This year's mystery is named "Frolic" and features the colors from a field of Texas bluebonnets. 


Frolic! mystery by Bonnie Hunter

The colors Bonnie is using include two shades of blue with accents in raspberry and green. Always feeling the need to make every quilt my own, I debated for quite awhile about my color palette. My final choice was inspired by this layer cake from the line "Captiva" by Connecting Threads.


Where Bonnie is using dark and medium blues, I will substitute black and grey prints. My turquoise will replace her raspberry/fuschia, and I will use the golden yellows instead of green.

Our first assignment is making 4-patches. I've got these 20 units made plus plenty more waiting to be pressed. So far I'm happy with my color choices, and I'm glad we started with an easy clue.


I'm linking up with Design Wall Monday at Small Quilts and Doll Quilts, Moving it Forward at Em's Scrapbag and Monday Making at Love Laugh Quilt. Check them out for lots of great inspiration.

Happy quilting everyone!


Julie in GA

Saturday, October 12, 2019

Scrappy Rainbow Saturday--Playing with Peels

Ever since the beginning of the year, I have been hand applique stitching little 3" Orange Peel blocks as part of the Rainbow Scrap Challenge. Actually, I believe I started late last year with a few sample blocks to make sure I liked the idea before committing to it. I've made over 100 blocks since then, and I'm feeling like the time has come to make a plan for how I'm going to use them all.

My original inspiration was a design I saw from a company called Honest Fabric. This company makes custom printed quilt tops in a wide variety of designs. The quilt tops can be used for free-motion quilting practice or to make a quick quilt without spending long hours piecing it. You can learn much more about them at the Honest Fabric website.

I'm not sure I would ever want a pre-printed quilt top, but I sure love this Orange Peel design that they produce.


Honest Fabric "Orange Peel" 

That design was my starting point. I have been trying to make 12-16 Orange Peel blocks per month with a variety of scrappy black and dark grey background fabrics. To reproduce the above design in my quilt would require a total of 320 blocks, which means at least another full year of making Orange Peels, maybe more. I'm not sure I can keep going for that long, so it's time to look at some other options. Here a few of my layout ideas.


The last photo is my attempt to mimic the layout from the Honest Fabric version, and I must admit that it is my favorite of the bunch. I'm a sucker for a good gradation of colors, especially the whole rainbow. Maybe another year isn't out of the question (but I'm going to need to get some more background fabrics!) I'd love to hear what you think about these choices.

I am linking up with the Rainbow Scrap Challenge on Saturday and with Oh Scrap! at Quilting is more fun than Housework and Slow Sunday Stitching at Kathy's Quilts on Sunday. On Monday I'm linking up with Design Wall Monday at Small Quilts and Doll Quilts, Moving it Forward at Em's Scrapbag and Monday Making at Love Laugh Quilt. Be sure to check out all of the wonderful projects that everyone is sharing! 

Julie in GA

Sunday, September 29, 2019

Something Old Becomes Something New

One of my recent goals in the sewing room has been to sort through the boxes and bags of leftovers from previous projects. I never know what to do with the bits and pieces, partial strip sets and extra blocks when I finish a quilt. Most of the time, they languish in a box while I jump on to a new project. The accumulation has become rather ridiculous.

While sorting through a box of parts and pieces from several old projects, I ran across some partial units from a challenge quilt that I made in 1999! Here is a scan of a 1999 photo of the original quilt. I couldn't do much in editing to improve the quality of the photo, but you can get an idea of the quilt design. Finished size of the quilt is probably between 36" and 40".


Here are some of the leftover pieces that were in that box. There were enough parts to make 5 or 6 star blocks, but not enough of the background fabric. The pattern is "Santa Monica Stars" from the book Even More Well Connected by Mary Ellen Hopkins, published in 1995.


I decided to switch the fabric at the center of the stars and auditioned a couple of other options.


I decided to go with the last choice, and also had just enough of that fabric to use it for the sashing and border on my new little wallhanging. 


Santa Monica Stars
22.75" square
I must be ready for the hot weather to be done, because I keep wanting to dig into the fall colors in my fabric collection. Unfortunately, our forecast still shows highs over 90 for another week!


I'm linking up with Design Wall Monday at Small Quilts and Doll Quilts, Moving it Forward at Em's Scrapbag and Monday Making at Love Laugh Quilt. Check them out for lots of great inspiration.

Happy quilting everyone!


Julie in GA


Monday, September 23, 2019

Kevin's Scrappy Summer Mystery--two tops!

The Simply Sensational Summer Scrap Quilt mystery quilt-along, hosted by Kevin the Quilter, began in late June of this year. I resisted joining in at first, but eventually gave up and started making little four-patches from my blue scraps, which were joined soon after by the yellows. 

Kevin posted the final layout for the quilt at the end of August. His version was made from 2.5" squares and finished at approximately 72" x 89". Mine is made from 2" squares, and I knew I didn't want a big quilt. I joined four-patches and squares following Kevin's instructions until I reached this point, then declared it finished! This top measures 48" square. Check out the difference in colors in my indoor and outdoor photos!


After completing that top, I still had lots of 4-patches around. I started playing with them on my design wall. This is what I was able to make from those leftovers.


It seemed unfinished, so I added some borders with more squares. Of course, I had used up all the original parts, so making the borders meant cutting and sewing even more squares. Eventually I ended up with this 39" top, perfect for a baby quilt.


I had a great time playing in my scraps making these two little quilts. Thanks to Kevin for the great quilt-along!

I'm linking up with Design Wall Monday at Small Quilts and Doll Quilts, Moving it Forward at Em's Scrapbag and Monday Making at Love Laugh Quilt. I'm also linking up with Needle and Thread Thursday at My Quilt Infatuation, Let's Make Baby Quilts at Michelle's Romantic Tangle, Whoop Whoop Friday at Confessions of a Fabric Addict and Finished or Not Friday at Alycia Quilts.

Happy quilting everyone!


Julie in GA

Monday, August 26, 2019

Scrappy Mystery for Design Wall Monday

Last Thursday, Kevin the Quilter revealed the final layout of his Simply Sensational Summer Scrap quilt mystery. The hundreds of squares and 4-patches are getting joined together into a wonderful scrappy mosaic quilt.

I had to work over part of the weekend, which seriously cut into my sewing time, but I still made a good start at sewing together my blue and yellow units.  I managed to construct the center square, the first border, and the corner triangles. This still has more borders coming, all of them made from a scrappy mix of squares.


When I started, I was afraid that some of my blues were too light and would pop out too much, but I am very happy with the way the colors are working together. The Milwaukee Brewers logo was the inspiration for my color choices, and it might need to get worked into the design of my quilt--maybe an applique in the center square?


I'm linking up with Oh Scrap! at Quilting is more fun than Housework, Design Wall Monday at Small Quilts and Doll Quilts, Moving it Forward at Em's Scrapbag and Monday Making at Love Laugh Quilt.

Happy quilting everyone!


Julie in GA

Sunday, August 4, 2019

Kevin's Mystery

Back in late June, Kevin the Quilter announced that he was going to be hosting a new mystery project, his Simply Sensational Summer Scrap Quilt. He promised the sewing would be easy, with the clues being posted one month apart. It is all based on squares in your choice of size, and you only need to choose two colors to work with.

The first clue was posted at the end of June, and I resisted joining in for several weeks (too many other projects hanging around my sewing room.) Then one weekend near the end of July, I was putting away some pre-cut squares and realized that I had a plethora of 2" squares in blues--that was the beginning. I started by sewing my blues into pairs, which later become 4-patches--over 180 of them!


Blue 2-patches, sorted light/dark
Blue 4-patches in stacks of 10, plus extra squares at the right

My original plan was to use yellow as the second color, but I was also considering white/cream/beige as the alternate. When I asked my husband his opinion, he pointed to the logo on my Milwaukee Brewers sweatshirt and asked "How can you doubt that yellow is the right choice?"


I proceeded to pull out all the yellow 2" squares I could find, plus cut many more from strips and stash. Here is the collection of golden goodness.

130+ yellow 4-patches in stacks of 10
The next clue won't be posted until the end of this month, and it is very hard waiting to find out what we will be making with all of these parts. I will have to be patient, but it isn't easy!

It's not too late to join the fun, and it really is as easy as Kevin promised. You can find his intro post HERE, the first clue HERE and the second clue HERE.

I'm linking up with the Rainbow Scrap Challenge on Saturday, Oh Scrap! at Quilting is more fun than Housework, Design Wall Monday at Small Quilts and Doll Quilts, Moving it Forward at Em's Scrapbag and Monday Making at Love Laugh Quilt.

Happy quilting everyone!


Julie in GA

Sunday, June 9, 2019

Stitching and DeStashing--Quilt Top Finished!

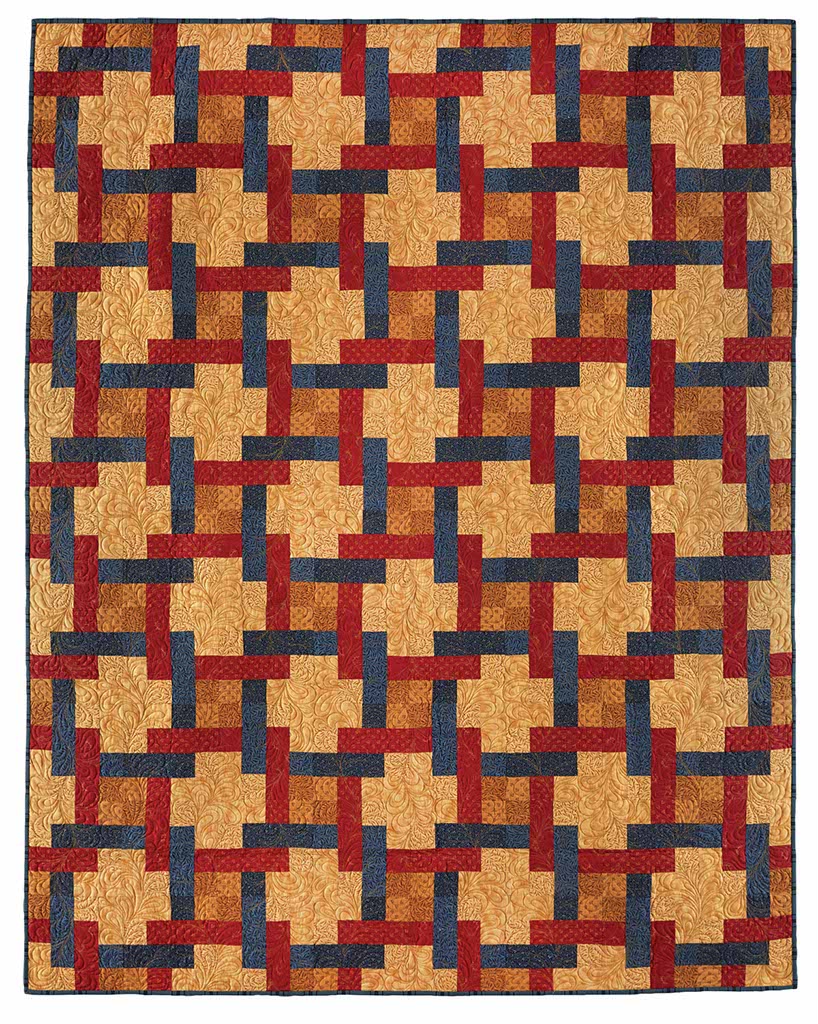
One of my quilting goals for last week was to finish joining all of the Woven Squares blocks together and add the borders. Believe it or not, it actually got done--I now have a finished quilt top! I'd hoped to get some good outdoor photos of it, but it has been too grey and rainy here.

Woven Squares, 59.25" x 75.25"

The Woven Squares pattern was originally published in Fons and Porter's Easy Quilts magazine, Winter 2016. It is also available on their website 
HERE. My version has 48 blocks in it, rather than the 80 blocks of the original pattern. I needed to add borders to bring mine up to the right size for a Quilt of Valor. There wasn't enough of the RWB stripe fabric for a wider border, so I ended up adding a pieced border that extends the blue rings around the outside edges of the design. You might be able to see the seam in the lighter blue segment next to the striped border in the following photo--that is where the pieced border was added. 


This quilt was made entirely from my stash! That is such a good feeling. The background fabric and the stripe in the border are now used up--I might need to look for some more of that wonderful RWB stripe. I'm sharing with the Rainbow Scrap Challenge since I used stash/scraps for this, and our color of the month is dark blue. Total fabric used for the quilt borders was 1.375 yards (yardage for the blocks was counted last week.) No new fabric was added over the past week! 


2019 STASH TOTALS
Used last week:                        1.375 yards
Used year to date:                      20.0 yards
Added last week:                          0.0 yards
Added year to date:                   27.75 yards
Net stashed year to date:        7.75 yards


Kate's 15 Minutes to Stitch challenge at Life in Pieces has us tracking how many days each week we get in at least 15 minutes of quilting time. My push to finish this quilt top had me spending well over 15 minutes on quilting each day.

15 Minute Challenge:  
6/2 - 6/8                  7 of 7 days
2019 Total         147 of 159 days


Check out more stash reports at quiltpaintcreate and join the 15 Minutes to Stitch challenge at Life in Pieces. I'm also linking up with the Rainbow Scrap Challenge at So Scrappy, Oh Scrap! at Quilting is more fun than Housework, Design Wall Monday at Small Quilts and Doll Quilts, Monday Making at Love, Laugh, Quilt and Moving It Forward at Em's Scrapbag.

Happy quilting everyone!


Julie in GA

Monday, May 27, 2019

A New Project!

This is the time of year when I always pull out any red, white and blue quilts to display around the house. This is also when I tend to think about making something in those colors. I've been working on some very simple blocks from a pattern called Woven Squares. It was originally published in Fons and Porter's Easy Quilts magazine, Winter 2016. It is also available on their website HERE.


For my version, I am using a single white print background, but went scrappy with the reds and blues. My quilt will be smaller, with 48 blocks instead of the 80 shown in the pattern. So far, half of my blocks are complete.


My goal for today is to finish making the remaining 24 blocks, and maybe start joining them together. This will probably become a Quilt of Valor, which means it will require a border or two to get it up to the required size.

I'm linking up to Design Wall Monday at Small Quilts and Doll Quilts, Monday Making at Love Laugh Quilt, and Moving It Forward at Em's Scrapbag. Be sure to check out all of the wonderful projects that everyone is sharing! 


Julie in GA

Monday, May 6, 2019

Design Wall Monday--5/6/2019

While looking through my past blog posts, I discovered that the last time I shared my Flying Dutchman blocks was almost exactly six months ago. Here is the photo that I shared at that time.


Dutchman's Puzzle/Flying Dutchman block variations
After a block-making binge last week, the numbers have grown significantly. I'm still uncertain about a plan for how they will all go together, but have been having fun choosing fabric combinations for additional blocks. I do know that I plan to add something as sashing or framing for the blocks. The finished sizes for the blocks are 8" and 12". Here are a couple of layout ideas. 


Vertical columns


Horizontal rows (same photo as the first, but rotated 90 degrees)
Diagonal setting of 12" blocks
The large block with the blue background keeps jumping out at me in all the photos, and I can't decide if I like that or not. I should probably make a couple more blocks using blue similar background colors to help it fit in better. Making decisions is hard--that's why this project keeps getting put back into a box and ignored for six months at a time!

I'm linking up to Design Wall Monday at Small Quilts and Doll Quilts, Monday Making at Love Laugh Quilt, and Moving It Forward at Em's Scrapbag. I'm a day late, but I'm also linking up with Oh Scrap! at Quilting is more fun than Housework. Be sure to check out all of the wonderful projects that everyone is sharing! 


Julie in GA

Monday, November 5, 2018

Flying Dutchman Blocks

Over the weekend I pulled out some blocks that were started about a year ago.   These are a group of blocks that I started making last fall when my musician husband was playing in the orchestra for a production of the opera "The Flying Dutchman."  Dutchman's Puzzle or Flying Dutchman are two of the names used for some of these block patterns.


Dutchman's Puzzle/Flying Dutchman block variations

The blocks in the top and bottom rows finish at 8", and the middle row has 12" blocks. I have no specific plan for where I'm going with these blocks or how big a quilt they will become. For now I'm just enjoying playing with the colors and different pattern variations. I love the spinning motion in these designs!


One of the blocks was made twice because the first attempt (on the left) was spinning in the opposite direction of all the other blocks. Naturally, it was one of the most difficult blocks of the whole group. Those little flying geese at the center measure only 1" x 2"!

I'm linking up to Design Wall Monday at Small Quilts and Doll Quilts, Monday Making at Love Laugh Quilt, and Moving It Forward at Em's Scrapbag. Be sure to check out all of the wonderful projects that everyone is sharing! 


Julie in GA

Sunday, October 28, 2018

Back Panel for Tell It to the Stars

It has been a month since I shared my Tell It to the Stars quilt top. Last week I started working on the back for this quilt. I didn't have quite enough of the fabric I'm planning to use for the back, but I  had some leftover/extra parts from making the front of the quilt. There were two of the alternate blocks, plus I made four more of those (see them in yesterday's post.) I also had the setting and corner triangles that didn't make the cut for the front of the quilt.


Setting and corner triangles

All of those alternate blocks and setting triangles have been joined together into a long, narrow panel which will run down the center of the quilt back. The photo shows that panel before the final seam was stitched. I knew there was no way I could get a photo of the entire piece all together--it measures about 17.5" x 103".


I need to add a little of the backing fabric at both ends of this panel to make it a bit longer. After that, all that's left is to attach lengths of backing fabric along each side of the panel--then my quilt will have a finished back (hopefully by the end of the week!)

I'm linking up to Design Wall Monday at Small Quilts and Doll Quilts, Monday Making at Love Laugh Quilt, and Moving It Forward at Em's Scrapbag. Be sure to check out all of the wonderful projects that everyone is sharing! 


Julie in GA

Sunday, October 14, 2018

Sashing Auditions

Since early this year, I have been making Spinning Boxes blocks as one of my projects for the Rainbow Scrap Challenge. The block is my own design, and you can find a tutorial for it HERE. I've made enough blocks for a throw quilt, and now is the time to figure out my setting.

All along I've felt that the blocks will look best set diagonally, and a few weeks ago I tried out a few fabrics for setting triangles. None of those fabrics seemed like the right choice, so I made partial blocks to use as the setting triangles. That leaves me with bias edges all around the quilt. To keep the stretchiness under control, I've decided to add sashing and a border for stability. Over the weekend I auditioned some fabrics from my stash.


Round one was light/medium grey prints. I like grey as a neutral with bright or rainbow blocks, but these greys didn't seem to add any life to the quilt blocks.


For the second round, I pulled out a darker grey strip, plus a few different black prints. I definitely prefer the way the black prints make the bright colors in the blocks pop. Anyone else have an opinion? 

I'm linking up to Design Wall Monday at Small Quilts and Doll Quilts, Monday Making at Love Laugh Quilt, and Moving It Forward at Em's Scrapbag. Be sure to check out all of the wonderful projects that everyone is sharing! 


Julie in GA

Sunday, September 30, 2018

Seeing Stars--a finished top!

For the past seven weeks, I have been participating in the Seeing Stars QAL, hosted and designed by Melissa Corey at Happy Quilting. It has been great fun seeing everyone's version of Melissa's design, and I'm happy to be adding my finished quilt top to the display.


Seeing Stars quilt top
64.5" x 80.5"
 
My quilt is smaller than Melissa's 80" x 80" design, mostly because I didn't have enough background fabric for the whole quilt. I wanted to use up some of my older Christmas fabrics, and the best background fabrics were two pieces of beige poinsettia prints that measure almost 4 yards combined. You can see the two different backgrounds in these close-up photos of some favorite blocks.

Double Star, 24" block
Curvy Star, 20" block
It was great fun to take part in this wonderful QAL. Melissa's instructions were very clear and easy to follow, and I have loved seeing so many beautiful versions of her design.

I'm sharing my finished top with the Seeing Stars QAL link-up. I'm also linking up to Design Wall Monday at Small Quilts and Doll Quilts, Monday Making at Love Laugh Quilt, and Moving It Forward at Em's Scrapbag. Be sure to check out all of the wonderful projects that everyone is sharing! 


Julie in GA

Monday, September 24, 2018

Seeing Stars QAL--Week 6

There were all sorts of other things I should have been doing over the weekend, but I couldn't resist spending some time working on the last set of blocks for the Seeing Stars QAL, hosted by Melissa Corey at Happy Quilting. Here are my Applique Star blocks. The next step is quilt top assembly--I can't wait!


I'm linking up to Design Wall Monday at Small Quilts and Doll Quilts, Monday Making at Love Laugh Quilt, and Moving It Forward at Em's Scrapbag.  I'm also sharing my blocks with the Seeing Stars QAL link-up. Be sure to check out all of the wonderful projects that everyone is sharing! 


Julie in GA

Sunday, September 16, 2018

Seeing Stars QAL--Week 5

This week's assignment for the Seeing Stars QAL by Melissa Corey at Happy Quilting was to make 8" Basic Stars (aka Sawtooth Stars.) For the first time, the number of stars I needed to make for my smaller version of the quilt was the same as Melissa's version. Here are my 11 Basic Stars in their Christmasy goodness!


Wednesday is the day that Melissa will post the instructions for our last set of blocks, the Applique Stars. They will be 4" finished blocks, and we are making lots of them to fill in the gaps on our quilts. I sure hope we get a little extra time on those--I don't think I can get 20 done in a week unless Melissa has some really fast tricks up her sleeve!

I'm linking up to Design Wall Monday at Small Quilts and Doll Quilts, Monday Making at Love Laugh Quilt, and Moving It Forward at Em's Scrapbag.  I'm also sharing my blocks with the Seeing Stars QAL link-up. Be sure to check out all of the wonderful projects that everyone is sharing! 


Julie in GA
Related Posts Plugin for WordPress, Blogger...